Trail Maintainer's Guide (DRAFT)
Just as consistent road signs and lane markers enable drivers to safely travel across the country without confusion, a consistently marked and maintained trail enables hikers to travel without confusion.
Most of our trails are neither surfaced nor limited to woodlands. Their varied nature, ranging from paved roads to utility corridors to gravel roads to woodlands, makes them more interesting than "green tunnels," but also challenging to consistently mark. This guide details the maintenance practices for RCTC trail maintainers so that our trails are consistently marked and maintained end-to-end, across all types of terrain.
Standards
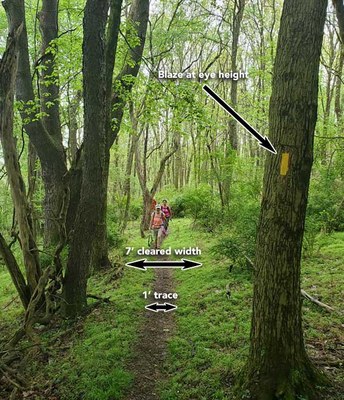
In woodlands, the trail should have a minimum one-foot trace or treadway with three feet on both sides cleared of briars and other vegetation that could grow into the treadway. If the path is properly cleared, hikers will create the trace by walking in the center of the clearing.
Across open areas, the same standards apply in addition to having clear blazing on both sides of the open area. If the blaze on the opposite side cannot be seen, posts or signs along the way may be needed.
Along power corridors, utility poles can be blazed. On gas line corridors, trees along the edge may be blazed, but are easy to miss because they're often far away from the treadway. Signs and posts cannot be placed within utility rights-of-way, so the only recourse is blazing gas line marker posts and/or rocks on the ground.
Blazes
 Blazes are the primary means of marking the trail. Their purpose is to keep hikers on the trail so they don't get lost or wander onto the wrong property, while minimizing environmental and aesthetic impact.
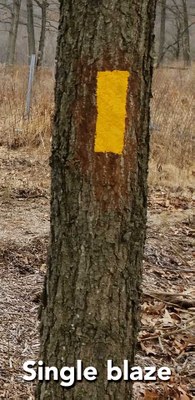
The standard trail blaze is a painted yellow rectangle with sharp corners nominally measuring 2 inches wide by 6 inches tall. Sharp corners improve contrast because right angles are rare in nature.
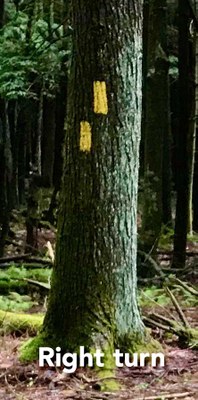
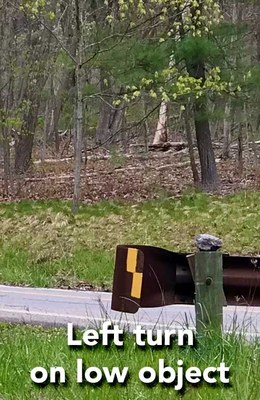
A single blaze tells the hiker they're on the trail. A double blaze -- two single blazes, one above the other -- tells the hiker the trail is turning. The top blaze is offset in the direction of the turn (right or left).
A double blazed without an offset (i.e., one blaze directly above the other, also called a stacked blaze) signifies that something is changing that may not be a turn. This would be used, for instance, where the trail follows a forest road that turns sharply but the trail continues straight into the woods. Without the alert, hikers may see a single blaze and assume the trail continues following the forest road. 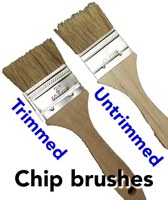 A stacked blaze is also the only way to double-blaze a narrow object, such as a 3" wide fiberglass post.
For double blazes, leave a gap between the upper and lower blaze, preferably 2 inches where possible.
All blazes should be plumb (straight up and down), even if the object being blazed is leaning.
Use a 2-inch chip paint brush (cheap & disposable) with the bristles trimmed straight so that it is square and stiff. Do not use a thick brush or one with overly soft bristles. Using a 2-inch brush allows you to accurately paint a 2 x 6 inch blaze: one brush width across and three brush widths down.
Paint and brushes will be provided by the RCTC. Do not use other unapproved paint, especially oil-based paint, as it can injure trees. Don't paint damp objects, or if it could rain or freeze within four hours.
There are three terms to know when blazing a trail: Location, Orientation, and Visibility (LOV).
Location: where and how often
In woodlands, prominent trees with large diameters are the most commonly blazed objects. For singles blazes, trees should be at least 4" in diameter to provide negative space around the blaze for contrast. Smaller diameter trees may be blazed if nothing else is available. Double offset blazes need a wider tree, preferably at least 6" diameter.
Along roads, telephone poles and trees are the preferred objects for blazing, whichever is closer. Guardrails, backs of road signs, and pavement are acceptable if nothing else is available (subject to municipal constraints).
A blaze on every utility pole along a road section is probably overblazing. Blaze every second or third pole, depending on pole spacing and line of sight.
Blazes can be on either the left or right side of the trail, whichever has the closer object with good visibility.
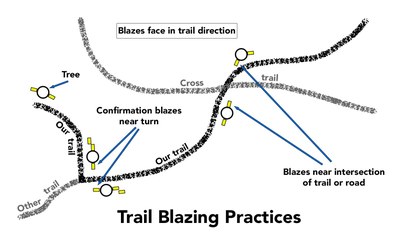 Double blazes should be used where the trail changes direction in an ambiguous way. A bend or jog in the trail should not be double blazed. Switchback turns, for instance, should not be double blazed except where another path intersects it. Remember, a double blaze is only needed if it's possible for hikers to be confused about the trail direction.
Place the next single blaze as soon as possible after any turn or trail/road crossing. This is a confirmation blaze and helps reassure the hiker that they are still on the trail.
There is no set distance between blazes. Blazing frequency ultimately depends on local trail conditions. Remember that an overblazed trail is unsightly, detracts from the wilderness experience and takes more time to maintain. Underblazing, on the other hand, makes the trail difficult to follow.
As the distance between blazes increases, so does concern by the hiker that a turn was missed. At a typical hiking pace of 2.2 miles/hour, 62 seconds will pass between blazes spaced 200 feet apart. This is fine if there are no intersecting trails and the trace is well defined. But where there are opportunities to go off-trail or where the trace may be unclear, more blazing is probably needed. Pay particular attention to this on new sections where the trace isn't well defined, and lesser-used sections where the trace is covered with leaves or snow for extended periods.
Avoid arbitrary changes in blazing frequency as this tends to confuse the unfamiliar hiker.
Orientation: blaze placement
Blazes should be painted at eye level. However, sometimes the only object to paint is closer to the ground, such as a guardrail. If nothing else is available, it's acceptable to place blazes on the pavement, but blazes not on a vertical surface degrade much faster.
Blazes on vertical surfaces always face in the direction of travel on the trail; experienced hikers depend on this. If they don't see a blaze ahead, it's common to turn around and look back where they came from, hoping to see a blaze facing them.
Both sides of an object should be blazed. This allows hikers to glance at the backside of the object they just passed to see where that blaze is facing to determine the trail direction if the trace is unclear. Sometimes another object nearby would obstruct visibility of a blaze on the opposite side, in which case the closest unobstructed object should be blazed instead. Because confirmation blazes immediately after a turn are important only for oncoming hikers, it's not necessary to blaze both sides of those objects.
Visibility: clearing obstructions
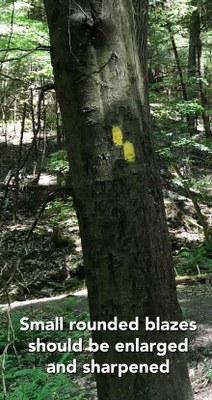
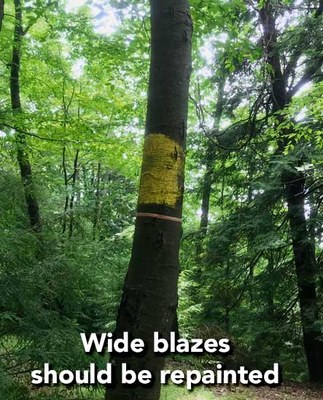
Visibility to the hiker is the most important consideration when deciding where to place a blaze.
Once a suitable location is determined for the blaze, prepare the surface for painting. Rough barked trees should be smoothed with a scraper or folding saw or some other tool. Smooth barked trees and other smooth surfaces can be wiped cleaned with a dry rag or gloved hand. Be certain to not damage the tree by cutting through the bark. Only smooth the bark, do not remove it.
After preparing the surface, use the two inch brush to paint the top edge of the blaze, then dab three brush widths down the center of the blaze, followed by the bottom edge, forming a capital i. Step back down the trail far enough to observe your choice from the perspective of the oncoming hiker. This allows you to see if the blaze is plumb and properly oriented on the object. Then return and paint the edges and fill in the blaze, adjusting as needed.
At turns, and particularly at less obvious turns, always remove more vegetation in the direction of the turn so that the hiker is naturally drawn toward the open space and in the proper direction of the trail.
When refreshing blazes, never simply repaint an old blaze. Always reassess whether the blazing location could be improved. The fewer blazes the better, so attempt to make every location count. Remove unnecessary blazes by scraping them away (without damaging the object) or spray painting over them with a color most similar to the background of the object -- brown or black.
Remove obscuring branches on the blazed tree and any other tree that blocks the blaze from the view of oncoming hikers as far as possible.
Cut branches flush to the next stem or trunk; never leave stubs. When sawing larger branches, always partially undercut it first, then cut from the top down to the undercut. This keeps the branch from peeling bark off the tree when it falls.
Signs and Posts
Signs and posts are used with landowner permission typically in locations where there is nothing suitable to blaze. Signs are also used near roads to both mark the trail and advertise it. Blazed 4x4 posts are most often used where the trail crosses an open area. Contact the trail manager if you believe a sign or post is warranted.
Clearing
Loppers or hand clippers, a hand saw, and possibly a weed whip are necessary tools for maintaining a properly blazed trail.
Logs that cannot be stepped over easily or are not acting as water bars should be removed from the trail. If the obstruction is too large to clear with a hand saw, request assistance from an RCTC sawyer.
Cut brush such as multiflora rose, knotweed, and other tall vegetation at least three feet back from the treadway. These plants tend to grow toward and over the trail, snagging hikers and obscuring blazes. On hillsides, pay special attention to clearing the uphill side of the trail. Branches, vegetation, and other debris that encroach the trail will force the hiker to its outer edge, eroding the shoulder.
Remove tripping hazards from the treadway. Always cut saplings and other vegetation flush with the ground, ideally pulling plants entirely out of the ground if possible to prevent regrowth.
Creeks
On unbridged creeks, place stepping stones to help hikers stay dry while crossing. These will get washed downstream during high water and will need to be replaced periodically.
Landowners
Be aware of the landowner’s requirements and sensitivities when blazing and clearing (along local roads the municipality is the landowner). If you don't know what they are, be sure check with the trail manager before adding or removing blazes and pruning trees.
Most of our trails are on private property and permission was obtained only for hiking. If you see evidence of other activities not permitted by the landowner, please notify the trail manager.
If you encounter a landowner, identify yourself and your purpose and be friendly. Forward any complaints or concerns to the trail manager if you're unable to address them.
